Showing posts with label new room. Show all posts

Saturday, August 20, 2011

Summoning Room

This board section is available to be printed over at the Dungeon of Muggee. I didn't yet read the Quest that this room is intended for, but I thought it would be the perfect place to throw a Deamonic Monster at the Warriors!


The iron bound door opens into a dark chamber with a set of stairs leading up to a large platform. Old Spell components lie on a mat ready for use. The room looks like it has been sealed off for a very long time - no doubt to keep the horror on the platform from leaving!
  • The Summoning Chamber has either one (1-3) or two (4-6) Exit Doors, located somewhere along the far end of the room. The Exit Doors are magically sealed, and can only be opened after the Monster within is defeated.

  • If a Spell-casting Warring moves into the square containing the Spell components, they can take them and gain 1D6 points of extra Power they can keep until used up.

  • Instead of taking an Event Card, the Summoning Room contains Monster(s) that were summoned days, weeks, or perhaps years ago, and have been seething within ever since. Roll below to determine the creature(s) that the Warriors face.

Summoned Monster Table

1. Daemonette
2. 1D3 Fiends of Slaanesh
3. 1D3 Plaguebearers
4. Beast of Nurgle
5. 1D3 Bloodletters
6. Flamer of Tzeentch


Tuesday, August 9, 2011

Forgotten Chamber

This is another Dungeon Room adapted from the Dark Crypts - Chambers dungeon tile set by Lord Zsezse Works.


Exit Doors

The Forgotten Chamber does not have any Exit Doors!  Take the Dungeon Cards from the current stack and distribute them atop all of the other Dungeon Card stacks on the board, dividing them equally and placing them from the bottom of the stack to the top.  If there are no other active stacks of Dungeon Cards on the board, then the Warriors have reached a dead end and will need to search for Hidden Passages if they hope to continue the Quest!

Events

The isolated and desolate Chamber is long forgotten among the dungeon inhabitants.  It does not trigger an Event when entered.  Furthermore, when a 1 is rolled in the Power Phase, roll another 1D6.  An Unexpected Event occurs only if this second roll comes up a 1 or 2.

Monday, August 8, 2011

Sarcophagus Chamber

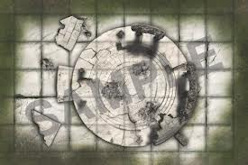
This room was created based on the beautiful dungeon tiles in the Dark Crypts Chambers set by Lord Zsezse Works.  Lord Zsezse produces some of the most spectacular tiles I've ever seen, rivaling the board sections that were created for WHQ itself.


Exit Doors

The Chamber contains one Exit, placed where the light is shining through the bars.  A Warrior needs to pass a Strength Check when adjacent to the bars to bend them apart and allow Exploration beyond.  The Warrior must spend their entire Warrior Phase in the attempt.

Events

The room will trigger an Event on a 1-3 of a 1D6 roll.

Examining the Sarcophagi

Any Warrior standing in a square that contain a closed sarcophagus can attempt to open it by spending their entire Warrior Phase there and passing a Strength Check.  Roll on the Closed Sarcophagus Table each time one is opened.

The open sarcophagus can be examined by moving into any square it occupies.  The first time that a Warrior enters such a square, roll on the Open Sarcophagus Table.

Closed Sarcophagus Table

1. After much straining, whatever was keeping the lid shut finally gives, but the force pushes the stone lid to the ground, shattering it with a terrific crash.  Draw an Event Card and re-roll on this table, re-rolling any 1's.  Any treasure must be collected after resolving the Event.
2. When the lid slides open, a burst of stale crypt dust envelopes you.  Pass a Toughness Check, or roll on the Crypt Dust Table below to determine the effects.  Inside is nothing more than a dessicated, ancient skeleton.
3. The skeletal remains of a warrior from some long lost realm is revealed.  Roll on the Arms and Armor Table below to determine what's salvageable.
4. Upon opening the sarcophagus, you sense the immediate presence of a malignant spirit, but there is also a potentially great reward within.  If you choose to attempt to overcome the entity and claim the reward, roll a Willpower Check as you struggle against its spiritual assault.  A failure indicates that the spirit has succeeded in cursing you for the remainder of the adventure, roll on the Curse Table below.  After the conflict, you search inside the coffin and find a Treasure Card.  You can take the treasure as long as you weren't turned into a toad!
5. Inside, among the remains, you discover some ancient jewelry worth 5D6x10 Gold.
6. Inside, amidst the dusty bones, you salvage a Treasure Card.

Open Sarcophagus Table

1. A Ghost drifts from the coffin, and attacks.
2. A Wight rises from the coffin, and attacks.
3. A Skeleton rises from the coffin, and attacks.
4. A mold-infested skeleton of an ancient Dwarf warrior lies within.  You can examine inside, but must first roll on the Mold Table below.  Inside is a Great Axe (like the Dwarf's) inscribed with 1D3 Runes (roll on Dwarf Guildmasters Table to determine which Runes).
5. A pile of dust is all that remains of the one buried here ... that, and his arms and armor.  Roll twice on the Arms and Armor Table below.
6. A bone white skeleton lies in a strangely regal manner within.  The strange thing about the remains is the skeletal left hand, which is made of pure gold!  A Warrior removing the hand could sell it in a Settlement for 500 Gold, but the GM might very well have some more interesting ideas in mind for this artifact ...

Crypt Dust Table

1. The dust is extremely toxic, and the breath that you took to inhale it was your last!  The Warrior is killed.
2. The dust ravages your lungs with searing pain.  You take 2D6 Wounds, modified for Toughness only, and are at -1 Toughness for the rest of the adventure.
3. The dust contains microscopic flecks of Warpstone, causing a random mutation!  Roll on the Chaos Warrior's Mutation table.
4. The dust severely irritates your eyes.  You are at -1 on all to-hit rolls for the remainder of the adventure, unless you encounter the Fountain of Light, which you can use to cleanse your eyes.
5. Falling on your knees, you lapse into a coughing fit that lasts 1D6 turns.
6. The dust smells strangely sweet, and grants you a premonition of the future!  You can look at the next Event Card coming up in the deck.

Mold Table

1. The mold spores explode in a lethal cloud.  Any Warrior in any of this crypt's squares must pass a Toughness Check or die.
2. The mold is highly corrosive and burns your hands as you examine the interior of the coffin.  Take 2 Wounds, and suffer -1 on all to-hit rolls for the remainder of the adventure.
3. The sickly and slimy brown growth is so vile that you must pass a Willpower Check of you cannot examine this sarcophagus any further due to revulsion.
4. You think you spot something of value, but to get to it you need to spend 1D6 turns scraping away the thick layers of rock hard, reddish mold caked inside.
5. A loathsome green and purple fungus has spread throughout the interior of the sarcophagus, and anything of value that was within is rendered worthless.
6. Roll an Initiative Check.  If you succeed, you recognize the cakes of white mold as Under Bread, a nutritious food source.  There is enough for 1D6 Provisions, that don't spoil after the adventure.

Arms and Armor Table

1. A Sword.
2. A Shield.
3. A Broadsword.
4. Chainmail Armor.
5. A Battle-axe.
6. Plate Mail (Dwarf only).

Curse Table

Except for result 1, these effects last for the remainder of the adventure.

1. Toad!  You are transformed into a toad.  M6, W1, T1, no attacks, never pinned.  If you make it out alive, your companions can take you to a Settlement Healer to try and have this reversed.
2. Rats love you!  Whenever an Unexpected Event occurs place 1D3 Giant Rats next to your figure as well.
3. Erratic Movement!  Each turn roll 1D6.  On a 1, you move in a random direction (1-4) for your maximum Movement, if possible.  Must roll to escape pinning like normal.
4. Foul Stench!  Any Warrior seeking to move adjacent to you must pass a Willpower Check or their Movement ends.
5. Poverty!  Each time you gain any Gold roll 1D6.  On a 1-3 you don't gain the Gold.
6. Butterfingers!  Each time you use a piece of Equipment, Treasure, or weapon, roll 1D6.  On a 1 you drop the item and must spend the rest of the turn picking it up.

Friday, July 22, 2011

Spider Pits


This Dungeon Room was constructed from e-Adventure Tiles: Temple of the Spider Queen from Skeleton Key Games.  Skeleton Key Games produces a treasure trove of dungeon tiles that you can print up and integrate into your Warhammer Quest adventures.

Exit Doors

The Spider Pits might have one, two, or even three Exit Doors.  Roll below as soon as the Room is drawn to determine how many Exit Doors it contains:

1-3. One Exit Door
4-5. Two Exit Doors
6. Three Exit Doors

Multi-Level

The Spider Pits is a Multi-Level Room, although figures can move normally between Levels without needing a staircase.  Because of this, it uses the standard rules for attack bonuses and penalties, and pinning rules, but ignores the rules for stairs, climbing, jumping, etc.

Monsters

Do not draw an Event Card when the Warriors enter the Room.  Instead, during the Monster Phase, place 2D6 Giant Spiders and 1 Gigantic Spider in the Room.  The Gigantic Spider always begins in the chamber at the lower right of the Pits, the one containing the Gold and Treasure Chest!  To determine where the Giant Spiders are, drop them from about a foot above the board and place them as close as possible to the squares they land in.

Webbing

Whenever a Warrior moves into a square containing webbing, they must pass an Initiative Check or they become webbed and their turn ends.  Whenever a webbed Warrior eventually breaks free, this means that they've slashed throught the webbing in that square, and it is no longer a hindrance for the Warriors.  Place a token of some sort on the square to indicate that the webbing there has been cut through.

Unexpected Events

When a 1 is rolled in the Power Phase do not draw an Event Card.  Instead, 1D6 more Giant Spiders appear on the board, next to one of the Warriors.  Draw a Warrior Counter to see who the lucky Warrior is.

Treasure

When all of the Spiders are defeated, the Warriors can claim the Treasure in the room.  To do so, at least one Warrior must move into the square containing the Treasure Chest.  Each Warrior earns a Gold Roll (x10).  Additionally, draw a Treasure Card and distribute it using the normal rules.

Wednesday, July 6, 2011

Charnel Caverns

This board section is based on the Cavern Corridor tile from Paizo's Ambush Sites Map Pack.

Charnel Caverns - Special Rules


There are many catacombs sprinkled throughout the World's Edge Mountains where the bones of ancient civilizations were laid to rest. Due to the influence of Chaos in the vicinity, often these brooding caverns become infested with the "restless dead" who rise when they sense the very rare presence of life in their gloomy halls.

  • The Charnel Caverns board section does not trigger an Event when the Warriors enter. Furthermore, it employs special rules for Unexpected Events. Rather than an Event occurring on a roll of 1 in the Power Phase, rolling a 1-5 will result in an undead rising at the end of one of the six chambers in the caverns (determine which chamber randomly). Use the following table to determine which type of undead has risen based on the Power Die roll. Undead will rise in the Power Phase as long as at least 1 Warrior is in this board section.
    1. Skeleton
    2-3. Zombie
    4. Ghoul (do not Break)
    5. Wight
  • While the 6 charnel chambers are the site of rising undead, they also potentially contain great wealth for the Warriors to explore. A Warrior that begins their turn standing in the last square of one of the chambers can search the chamber in the Exploration Phase, providing they performed no other action that turn. They rifle through the ancient chapel tomb for lost riches. Roll 1D6 each time a Warrior searches a chamber in such a manner (each chamber can be searched only once.)
    1. Restless Dead! Roll 4 dice. Use the table above to determine the type of undead spawned in the chamber, next to the offending Warrior.
    2. The Warrior disturbs some fragile stonework in their rummaging, and tons of ancient walls and ceiling work falls down around them. The Warrior takes 2D6 Wounds.
    3. The Warrior spend some time going through some crumbling pottery but discovers nothing of value. They can search the chamber again next turn if desired.
    4. The Warrior finds some interesting hieroglyphs inscribed on the walls of a tomb. Pull out an Objective Room Treasure Card. The inscriptions reveal the location of this valuable artifact. Use this as a hook for a future adventure. If this result was already rolled, re-roll.
    5. The Warrior uncovers a cache of ancient coins. They can make a standard Gold roll (x20) to determine the value.
    6. The Warrior pulls out a valuable relic from under the rubble of a crumbled tomb - take a Treasure Card.
You might find this room a bit difficult to manage in a game. The continuously spawning undead make it hard to leave the room since the Barbarian cannot Explore through the doorway while there are Monsters on the board section. I use a modified Exploration Phase house rule, so the mechanics here work more seamlessly in my games.

    Sunday, June 5, 2011

    Hall of Astaroth

    There's nothing like a great dungeon tile to get the creative juices flowing.  In my scouring of the web for high-quality tiles to add to my Dungeon Deck, I came across the French site Donjon-Esseclay, and this Hall of Astaroth.

    Hall of Astaroth - Special Rules


    The Cult of Astaroth infests the lower dungeon levels of the World's Edge Mountains, although sometimes evidence of their foul presence can be found higher up.  They perform diabolical rituals and sacrifices in these dread halls, and the presence of the arch-demon Astaroth is strong in this chamber as a result.

    Each Power Phase that Warriors are in the Hall, select a random Warrior in this board section.  The presence of Astaroth has decided to focus on this Warrior, and he gains one "Possession Point".

    Warriors can spend their Possession Points at any point during their Warrior Phase, one per Turn.  If a Warrior has any Possession Points left over when the adventure ends, Astaroth is far from satisfied, and in his prolonged hunger he feeds on the very soul of the Warrior.  The Warrior loses 1 Starting Wound for each Possession Point left over.

    When a Warrior spends a Possession Point, roll below to see what the effect is:

    1. Astaroth manifests himself in you with a deceit.  The next time you suffer any attack or damage, you must nominate a different Warrior next to you (if possible) to be the target, instead of you.
    2. You raise your arms and your eyes begin to give off an eerie glow, as your entire body levitates for a Whole Turn.  See the Wizard Spell Levitate for effects.  You can do nothing this Turn.  However, any Monsters on the board section are so creeped out by this that they suffer the effects of Fear against you for the rest of the combat.
    3. The blood drains from your head and you vomit out a vile mass of something that looks like pea soup.  You are so weakened that you are at -1 Toughness for the remainder of the adventure.
    4. You grin maniacally, and raise your arms as if to embrace the Monsters fighting you, a demonic grin on your face.  You can do nothing this Turn, and any Monsters fighting you hit automatically.  If there are no Monsters present, Astaroth is displeased, and feeds from your soul, remove 1 Starting Wound.
    5. Astaroth compels you to attack the closest Warrior in hand to hand combat.  You can ignore Pinning if you need to move to a Warrior this Turn.  If there is more than one possible target, determine one randomly.  If you cannot reach a Warrior this Turn, Astaroth feeds on 1 of your Starting Wounds.
    6. You begin uttering filthy curses at your fellow Warriors, and can do nothing more this Turn.  This does little more than cause you a great deal of embarrassment.

    Sunday, May 15, 2011

    Stone Oracle of Phideldes

    This board section is based on the "Weathered Statue" tile from Paizo's Gamemastery Map Pack: Ruins.

    Stone Oracle of Phideldes - Special Rules


    The twisted philosopher Phideldes perished mysteriously two centuries ago, but rumors abound about the Stone Oracle, a hidden shrine to his radical teachings buried somewhere in the World's Edge Mountains.  Some say the spirit of Phideldes now inhabits the stone statue of his likeness, and he still imparts words of dubious wisdom to visiting petitioners.

    • Roll 1d6 when the board section is placed.  On a 1-3 it has 1 Exit Door, and on a 4-6 it has two Exit Doors.  Place the Exit Door(s) along the row of squares opposite the entrance.
    • The room will trigger an Event on a roll of 1-3 on 1d6.
    • The four columns offer partial cover to any model standing in them, causing any attacks against them to be made at -1.
    • The two middle squares that the statue occupies are impassible.
    The following rules govern how a Warrior will petition the Stone Oracle to impart some of his wisdom, and how to determine the result.
    • The Stone Oracle will consult with the Warrior that is willing to offer the most Gold, and he will scan the Warriors' minds to determine which one is willing to pay the most.  To represent this, each player must secretly write down the amount of Gold he is willing to pay the Oracle on a sheet of paper (even if this amount is zero).  The Warrior who bid the most will get to consult the Oracle.  In the case of a tie (or if everyone bid zero) determine the Warrior randomly among those who bid the most.  The Oracle is quite lonely and demands the time from one of the Warriors!
    • The lucky(?) Warrior who offers the most Gold then ventures before the Stone Oracle, whose face animates, beginning to offer possibly valuable insight to the Warrior.  Roll 1d6 and add 1 for every 50 Gold spent by the Warrior and consult the table below:

      1-3. The Oracle laughs at the pittance offered and utters an insult that cuts the Warrior to their very core - he takes 2d6 Wounds modified only by his Willpower score.
      4. The Oracle reveals to the Warrior the best ways to attract the Monsters that dwell in this Dungeon.  Unfortunately, this means that when placing and controlling Monsters for the rest of the adventure, as many as possible will attack this particular Warrior, ignoring the one on one rule.  This applies to hand to hand combat only, not missile fire or spells.
      5. The Oracle is annoyed at the offering and misdirects the Warrior.  Add 1d3 Dungeon Cards to the top of the current pile.
      6. The precognitive wisdom that the Oracle bestows allows the party to ignore the next Event Card that is drawn.
      7-8. The Oracle bestows a revelation upon the Warrior, letting him know the events that will occur in the immediate future. The Warrior can look at the next 1d6 Event Cards and decide which ones to keep in the pile or discard.
      9-10. The Oracle divulges the cunning tactics of the Monsters that dwell in these halls.  During each Monster encounter, the Warrior is allowed to take an extra Warriors' Phase during the first turn of the combat.
      11-12. The Oracle imparts the philosophy of pacifism onto the Warrior.  Throughout the rest of the adventure, if the Warrior refrains from making any attack during a combat, then after all of the Monsters are cleared, he may draw one extra Treasure Card for himself.
      13-14. The Oracle bestows a boon of luck onto the petitioner, granting him 3d6 temporary Wounds.
      15-16. The Oracle imparts the secret layout of the traps in the underground complex to the Warrior.  Whenever this Warrior is subjected to a trap in the rest of the adventure, roll 1d6.  On a 4-6 he avoids the effect completely.
      17-18. The Oracle provides a vision of the Warrior's death, allowing him to avoid the outcome.  The next blow or event that would have otherwise killed this Warrior can be ignored.
      19+ The Oracle divulges some secrets that are so valuable to the Warrior that he gains +1 Toughness for the remainder of the adventure.  Now, roll 1d6, on a 6 this gain is permanent.

    Friday, May 13, 2011

    Arcane Observatory

    This is the first board section I've introduced into the game that isn't from the core WHQ box or expansion.  It's the "Ruined Observatory" tile from Paizo's GameMastery Ruins supplement.  To get more cards for my Dungeon deck, I purchased a second copy of WHQ from EBay, and use the extra Dungeon cards for any new rooms I want to integrate, using a black Sharpie to simply write the name of the room on the front of the card.

    Arcane Observatory - Special Rules


    Some long dead Wizard constructed this fabulous domed hall.  Animated stars, comets, and other celestial objects are magically projected onto the ceiling, moving in complex, compelling, elliptical patterns.  The intent of the spectacle is to dazzle and confound intruders, and the Monsters in the dungeon have learned to take advantage of its effects, and have themselves grown immune to its influence.

    • Roll a d6 to determine how many Exit Doors are in the Arcane Observatory, on a 1-3 there is one Exit Door, and on a 4-6 there are two Exit Doors.  Place both Exit Doors in the last row of squares in the room.
    • The Arcane Observatory will trigger an Event on a 1-3 of a d6 roll.
    • Each time a Warrior attempts to perform any action when on a square of this board section that is occupied by the dome, they must first pass a Willpower Check (roll 1d6, add Willpower, and score 7 or higher).  This includes moving (one roll for complete movement, no need to check each square), making an attack, casting a spell, drinking a potion, etc.  If they fail the Willpower Check, they simply forget to do what they had intended, as they are mesmerized by the wondrous spectacle of the stars displayed on the glorious dome overhead.
    • A Warrior standing on the central square of the dome can sacrifice a magical item (Treasure, Weapon, Armor, etc), which causes the spell emanating from the Observatory to be broken for all Warriors.
    • Monsters are immune to the arcane hypnotizing effect of the Observatory.